Trenchless Sewer Repair: Pipe Lining vs Pipe Bursting — The Complete Guide (2026)
Fix your sewer line without destroying your yard. This in-depth guide compares both trenchless methods — CIPP pipe lining and pipe bursting — so you can make the right choice for your home and budget.
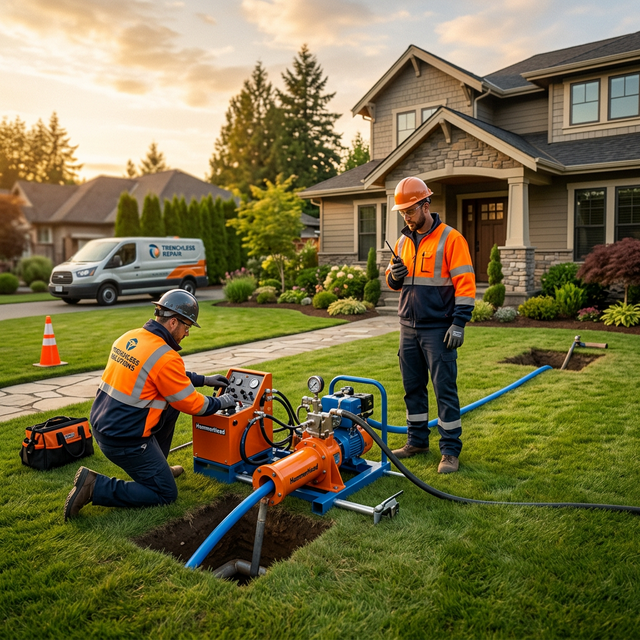
In the past decade, trenchless sewer repair has gone from a specialty technique to the preferred repair option for residential sewer lines across the country. If you've been told you need sewer line work, you should know these methods exist — because they can save your yard, your landscaping, and in many cases, thousands of dollars in restoration costs.
- What Is Trenchless Sewer Repair?
- Method 1: CIPP Pipe Lining Explained
- Method 2: Pipe Bursting Explained
- Pipe Lining vs Pipe Bursting: Full Comparison
- When Trenchless Works (and When It Doesn't)
- Trenchless vs. Open-Cut: True Cost Analysis
- 2026 Cost Breakdown
- What to Expect: The Day-by-Day Process
- Choosing a Trenchless Specialist
- Frequently Asked Questions
1. What Is Trenchless Sewer Repair?
Traditional sewer repair meant digging a full trench along the entire length of the damaged pipe — tearing up lawns, driveways, gardens, and sometimes paved surfaces. Trenchless repair accomplishes the same result with minimal excavation: typically just two small access pits at each end of the damaged section.
There are two primary trenchless techniques for residential sewer work:
- CIPP Pipe Lining — installs a new pipe-within-the-old-pipe without removing the original
- Pipe Bursting — destroys the old pipe outward while pulling a brand-new pipe behind it
Both methods have been in commercial use since the 1970s and are now standard practice in residential plumbing, backed by decades of real-world performance data and formal engineering standards (ASTM F1216 for CIPP; ASTM F1290 for pipe bursting).
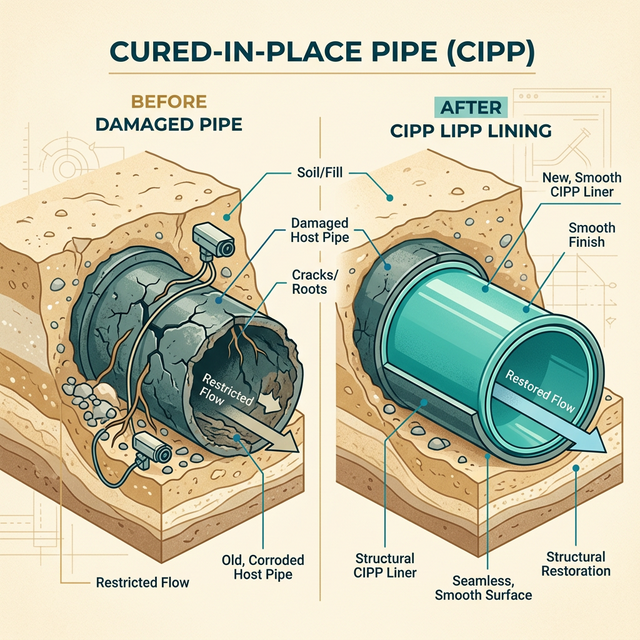
2. CIPP Pipe Lining Explained (Cured-In-Place Pipe)
CIPP lining is the most widely used trenchless method for residential sewer repair. It installs a structural new pipe inside the old, damaged pipe — without removing or replacing the original.
How CIPP Works — Step by Step
- Pre-repair cleaning. Hydro-jetting clears the pipe of all debris, grease, roots, and scale. A camera confirms the pipe is clean and structurally assessable.
- Liner preparation. A felt or fiberglass tube is saturated with a two-part epoxy or polyester resin. The liner is sized precisely for your pipe's diameter and the section's length.
- Liner insertion. The saturated liner is inverted or pulled into the pipe from one access point, expanding to press against the full interior wall of the existing pipe.
- Inflation and positioning. A bladder is inflated inside the liner, pressing it firmly against the pipe walls and conforming to any bends or offsets in the line.
- Curing. UV light, steam, or ambient temperature cures the resin from liquid to solid. UV curing takes 30–90 minutes; steam or ambient curing takes 3–6 hours.
- End trimming and reinstatement. The liner ends are trimmed. Any lateral connections (branch pipes) are reopened with a robotic cutting tool guided by camera.
- Final inspection. A camera pass confirms the liner is properly seated, joint-free, and structurally sound.
Rated lifespan: 50+ years (ASTM D2990 testing). Hydraulic efficiency: Equal to or better than new pipe — the smooth interior surface reduces friction loss. Root resistance: The seamless, jointless liner eliminates all root entry points for the repaired section.
3. Pipe Bursting Explained
Pipe bursting is the trenchless method of choice when the old pipe is too deteriorated to hold a liner, or when you want to upsize the pipe diameter. Unlike CIPP, pipe bursting completely replaces the old pipe — it just does so without excavating a trench.
How Pipe Bursting Works
- Access pit excavation. Two small pits are dug at each end of the section to be replaced — typically 2' × 3' each.
- Cable threading. A steel cable or hydraulic rod is threaded from one access pit through the existing pipe to the other end.
- Bursting head attachment. A cone-shaped bursting head (slightly larger than the original pipe) is attached to the cable, with new HDPE pipe connected behind it.
- Hydraulic pull. A powerful hydraulic puller at the receiving pit draws the bursting head through the old pipe. The head fractures and expands the old pipe outward into surrounding soil.
- New pipe placement. As the bursting head advances, the new HDPE pipe is pulled behind it, occupying the same channel.
- Connection and inspection. New pipe is connected at both access points. A camera confirms full installation. Pits are backfilled.
Unlike CIPP (which slightly reduces pipe diameter), pipe bursting can install a pipe that's one size larger than the original. This is useful for homes where the original sewer was undersized, or to accommodate added bathrooms and fixtures.
4. Pipe Lining vs. Pipe Bursting: Full Comparison
CIPP Pipe Lining
Most Popular- Old pipe stays in place as the form
- Repairs cracks, gaps, and root entry points
- Slight diameter reduction (~8–10%)
- Works with most pipe materials
- Suitable for bends up to 45°
- Does not work on collapsed pipes
- 50+ year rated lifespan
- Usually completed in 1 day
Pipe Bursting
Full Replacement- Old pipe fractured and displaced
- Brand-new HDPE pipe installed
- Same or larger diameter possible
- Works on most deteriorated pipes
- Less suitable for tight bends
- Works on some partially collapsed pipes
- 100-year HDPE pipe material
- Usually completed in 1–2 days
| Factor | CIPP Lining | Pipe Bursting |
|---|---|---|
| Old pipe removed? | No (remains as form) | Yes (fractured outward) |
| Pipe material result | Epoxy/fiberglass composite | HDPE polyethylene |
| Pipe diameter | Slightly reduced (~8%) | Same or larger |
| Works on collapsed pipe? | ❌ No | ⚠️ Partial collapse only |
| Works on Orangeburg? | ⚠️ Sometimes | ✅ Yes |
| Sharp bends (>45°)? | ⚠️ Limited | ❌ Difficult |
| Typical timeline | 1 day | 1–2 days |
| Yard disruption | Minimal (access pits only) | Minimal (access pits only) |
| Permit required? | ✅ Yes (most jurisdictions) | ✅ Yes (most jurisdictions) |
| Warranty (typical) | 25–50 years product | 25–50 years product |
5. When Trenchless Works — and When It Doesn't
Trenchless repair is often the better choice, but it's not universally applicable. Here's how to know which situation you're in:
Ideal Scenarios for Trenchless Repair
- Cracked or deteriorating pipe that hasn't fully collapsed
- Root intrusion through joints or cracks (after hydro-jetting)
- Pipe with good structural integrity but multiple leaking joints
- Situations where open excavation would damage expensive landscaping, driveways, or patios
- Clay, cast iron, concrete, or PVC pipe in repairable condition
When Traditional Open-Cut Is Better
- Pipe has fully collapsed over a long section
- Orangeburg pipe with extreme delamination making the walls too soft to line
- Severe 90° bends that prevent a liner or bursting head from passing
- Multiple lateral connections that complicate liner reinstatement
- Yard already requires excavation for other work (foundation repair, landscaping overhaul)
Some contractors recommend open-cut excavation by default because it's more familiar or profitable. If you're told trenchless isn't an option, ask specifically why — and consider getting a second camera inspection + assessment from a contractor who specializes in trenchless methods.
6. Trenchless vs. Open-Cut: True Cost Analysis
The sticker price of trenchless repair appears higher per linear foot than open-cut. But that comparison ignores the significant costs of excavation damage restoration:
| Cost Category | Trenchless | Open-Cut Excavation |
|---|---|---|
| Pipe repair / replacement | $4,000–$12,000 | $2,500–$7,500 |
| Excavation / heavy equipment | $0 (access pits only) | $800–$3,000 |
| Lawn restoration | $0–$200 | $500–$3,000 |
| Driveway / concrete repair | $0 | $1,000–$5,000 |
| Garden / landscape restoration | $0 | $500–$4,000 |
| Realistic total (50 ft line) | $4,000–$12,200 | $5,300–$22,500 |
When restoration costs are included, trenchless repair is frequently equal or less expensive than open-cut — and completes in a fraction of the time with far less disruption to your daily life.
7. 2026 Cost Breakdown
| Service | Low | Average | High |
|---|---|---|---|
| Sewer camera inspection (pre-work) | $150 | $200–$350 | $400 |
| Hydro-jetting (pre-lining cleaning) | $300 | $400–$600 | $900 |
| CIPP pipe lining (per linear ft) | $80 | $120–$180 | $250 |
| CIPP lining — 40 ft residential line | $3,200 | $5,000–$7,500 | $10,000 |
| Pipe bursting (per linear ft) | $60 | $80–$150 | $200 |
| Pipe bursting — 40 ft residential line | $2,400 | $3,500–$6,500 | $8,000 |
| Permit fee (varies by municipality) | $100 | $200–$400 | $500 |
| Post-work camera inspection | $0 (incl.) | $0–$150 | $150 |
Depth: Lines deeper than 6 feet require additional safety measures and equipment. Pipe diameter: Larger diameter pipes (4" vs 6") cost more per foot for liner material. Bends: Complex pipe routes increase installation time. Region: Labor costs vary significantly by geography.
8. What to Expect: The Day-by-Day Process
CIPP Lining Timeline (Typical 1-Day Job)
-
Morning: Site setup and hydro-jetting
Equipment arrives. Access pit dug if needed. Hydro-jetting clears the pipe (1–2 hours). Camera inspection confirms clean pipe. -
Mid-morning: Liner preparation and insertion
The pre-measured liner is saturated with resin on-site or arrives pre-saturated. Liner is inverted or pulled into the pipe (30–60 minutes). -
Midday: Curing
UV light train is pulled through the liner (30–90 min for UV; 3–6 hrs for steam/ambient). During curing, water service is temporarily interrupted. -
Afternoon: Trimming and lateral reinstatement
Liner ends are cut. Robotic cutter reopens branch connections under camera guidance. -
Late afternoon: Final inspection and cleanup
Full camera pass confirms completed liner. Access pit backfilled. Water service restored. Job complete.
Pipe Bursting Timeline (Typical 1–2 Day Job)
-
Day 1 morning: Excavation of access pits + equipment
staging
Two pits excavated at each end of the section. Hydraulic puller and cable equipment assembled. -
Day 1 midday: Cable threading
Pilot rod / cable is pushed through the existing pipe from sending pit to receiving pit. -
Day 1 afternoon: Bursting operation
Bursting head connected to cable with new HDPE pipe trailing. Hydraulic puller draws entire assembly through the old pipe (1–4 hours depending on length). -
Day 2 morning: Connection and finishing
New pipe connected at both access points. Joints sealed and confirmed watertight. Pits backfilled. Camera inspection completed.
9. Choosing a Trenchless Specialist
Trenchless repair requires specialized equipment and training. Not all plumbing contractors offer it, and quality varies significantly between those who do. Here's what to look for:
- Specialization matters: Look for contractors who perform trenchless repairs regularly — not those who "can" do it as a side offering. Ask what percentage of their sewer work is trenchless.
- NASSCO certification: The National Association of Sewer Service Companies offers certification programs (PACP, MACP, LACP) for contractors. Certified contractors demonstrate documented competency.
- Request a pre-work written scope: The quote should specify pipe lengths, liner brand and specifications, warranty terms, whether the permit is included, and post-work inspection protocol.
- Ask for the UV curing method: UV-cured CIPP is faster and more reliable than ambient-cure. Contractors using UV light trains signal investment in proper equipment.
- Warranty terms in writing: A 25-year product warranty from the manufacturer and 1-year labor warranty from the contractor are industry standards. Below this is a red flag.
"Who manufactures the liner or HDPE pipe you use, and can I see the manufacturer's product data sheet?" Reputable contractors use named products from established manufacturers and are happy to share technical documentation.